 Pin It
 My coworker Maria brought these to our office potluck on a Tuesday, and I watched three people go back for seconds before I even got to try one. The pita pocket was still warm, steam rising off the melted cheese, and when I bit into it, the creamy spinach-artichoke filling hit differently than I expected—bright from the lemon, rich from the yogurt, substantial enough to feel like an actual meal. I asked for her recipe that same afternoon, and now whenever I need something that feels fancy but doesn't require fussing, this is what lands on the table.
Last spring I made a batch for my sister's book club potluck, and she texted me halfway through that people were asking if I ran a restaurant. What made me laugh was how simple it felt to throw together at home—just a bowl, a spoon, and some good ingredients getting acquainted. That comment stuck with me because it reminded me that food doesn't need complicated technique to feel special.
Ingredients
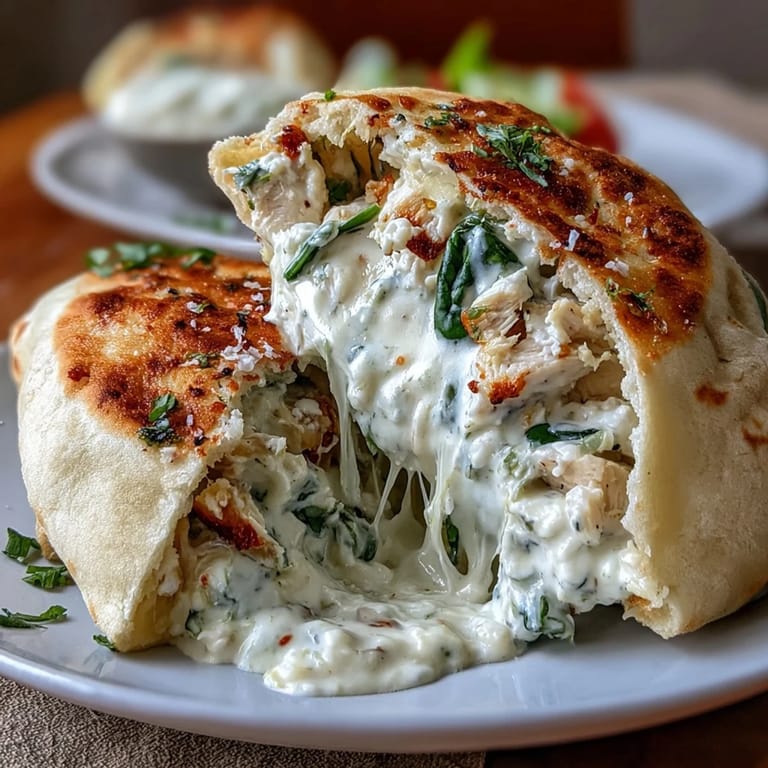
- Cooked chicken breast, 2 cups diced or shredded: Use rotisserie chicken if you have it—it's moister and more forgiving than leftover boiled chicken, and it saves you 15 minutes.
- Canned artichoke hearts, 1 cup drained and chopped: Frozen works too, but drain them well or your filling gets watery; I learned this the hard way.
- Fresh spinach, 1 cup chopped: Don't skip the fresh here—frozen spinach releases moisture as it thaws and can make the filling soggy.
- Greek yogurt, 1/2 cup: This is your secret for creamy filling without heaviness; it keeps things light and adds tang that brightens everything.
- Light mayonnaise, 1/4 cup: Binds everything together and adds richness; don't skip it in favor of more yogurt or you'll miss the subtle depth.
- Shredded mozzarella cheese, 1/2 cup: Choose whole milk mozzarella—it melts smoother than low-fat versions.
- Grated Parmesan cheese, 1/4 cup: This brings an earthy, salty note that prevents the filling from tasting one-dimensional.
- Garlic, 1 clove minced: Fresh garlic matters here; jarred will work in a pinch but tastes flat by comparison.
- Onion powder, oregano, red pepper flakes, salt, and pepper: Layer these carefully—taste as you go because Parmesan already brings salt to the party.
- Pita breads, 4 large: Whole wheat holds up better to stuffing than delicate regular pita, though regular tastes more indulgent.
- Fresh parsley and lemon wedges, optional: The parsley looks fresh and green, while lemon cuts through the richness when you squeeze it over before eating.
Tired of Takeout? 🥡
Get 10 meals you can make faster than delivery arrives. Seriously.
One email. No spam. Unsubscribe anytime.
Instructions
- Heat your oven and prep the filling base:
- Set the oven to 375°F while you combine the chicken, artichoke hearts, spinach, Greek yogurt, mayonnaise, both cheeses, and minced garlic in a large bowl. This gives your oven time to reach temperature while you work, and mixing everything in one bowl means fewer dishes later.
- Season to taste:
- Sprinkle in the onion powder, oregano, red pepper flakes if you like heat, salt, and black pepper, then fold everything together with a spoon until no white streaks of yogurt remain. The mixture should feel cohesive but not mushy—you're just bringing it all into harmony.
- Slice and stuff the pitas:
- Carefully cut each pita in half to create two pockets, then use a spoon to generously fill each pocket with the filling, pressing gently so it settles without tearing the bread. Don't be shy with the filling—these pockets can hold more than you think, and a stuffed pita beats a half-empty one.
- Arrange and bake:
- Line a baking sheet with parchment paper, stand the stuffed pitas upright or lay them on their sides (either works), then bake for 15 to 20 minutes until the cheese bubbles and the filling steams at the edges. You'll know it's done when the filling looks hot throughout and the cheese has melted into the filling.
- Finish and serve:
- Remove from the oven, scatter fresh parsley over the top if using, and serve with lemon wedges so people can brighten their bites if they want. Eat these while they're still warm—the pita gets soft and the filling stays creamy at that perfect moment.
 Pin It
 One afternoon I made these for my partner who was having a rough week, and watching them relax after the first bite reminded me why I love cooking. Food that tastes like it took effort but didn't actually demand much is its own kind of kindness.
Why This Works as a Complete Meal
The filling hits all your macronutrient marks—31 grams of protein per serving keeps you satisfied, the dairy and olive-oil-light mayo contribute healthy fats, and the pita plus vegetables cover your carbs. Serve it alongside a crisp green salad dressed with lemon and a touch of olive oil, and you've got something nutritionally complete that doesn't feel like a health thing you're forcing yourself to eat. The beauty is that it feels indulgent enough to be genuinely satisfying, which makes you less likely to snack later.
Making It Your Own
This recipe handles swaps beautifully because the base is forgiving. Sun-dried tomatoes add a sweet-savory punch if you're feeling adventurous, roasted red peppers bring brightness and a softer texture, and if you want richness, cream cheese replaces the yogurt and mayo perfectly. I've made it with rotisserie turkey breast when chicken wasn't on hand, and it was wonderful—different but equally good. Some versions work best with whole wheat pita for their nutty flavor, while others sing when paired with regular pita's softer structure.
Storage and Reheating Tips
These keep well in the refrigerator for up to three days, though they're best eaten the day you make them when the pita is still soft. To reheat, wrap each pita loosely in foil and warm in a 350°F oven for about 8 minutes—this prevents the pita from drying out while the filling comes back to temperature. You can also make the filling the night before and stuff the pitas the next day, which makes a weeknight dinner even faster.
- Let stuffed pitas cool for five minutes before wrapping for storage so condensation doesn't make them soggy.
- If your filling seems thin when mixed, refrigerate it for 15 minutes before stuffing—it firms up as the yogurt sets.
- Keep lemon wedges separate until serving so the acidity doesn't weaken the pita structure early.
 Pin It
 This recipe has become my go-to for times when I want to feel like I'm feeding people something special but I'm actually working with minimal fuss and maximum flavor. Make it for someone and watch them come back asking when you're making it again.
Recipe FAQs
- → Can I make these stuffed pitas ahead of time?
Yes, prepare the filling up to 24 hours in advance and store it in the refrigerator. Stuff the pitas just before baking to prevent them from becoming soggy.
- → What type of chicken works best?
Rotisserie chicken adds excellent flavor, but any cooked chicken breast works well. Dice or shred it for easy mixing into the creamy filling.
- → Can I freeze these stuffed pitas?
You can freeze assembled, uncooked pitas for up to 3 months. Thaw overnight in the refrigerator before baking as directed.
- → How do I prevent the pitas from getting soggy?
Avoid overstuffing the pockets and bake immediately after filling. The heat helps crisp the bread while melting the cheese filling.
- → What sides pair well with these stuffed pitas?
A crisp green salad with lemon vinaigrette complements the rich filling perfectly. Roasted vegetables or a light cucumber salad also work nicely.